How to Take Photos of a Meteor Shower

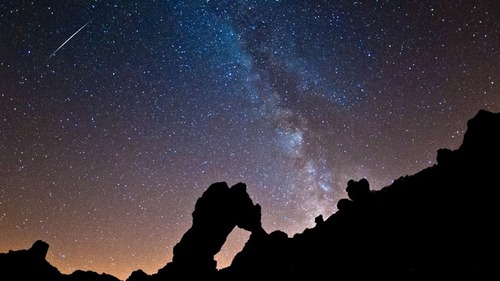
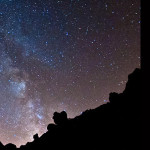
perseid-meteor-showerMeteors or “falling stars” are a surprisingly common occurrences…. and on most clear, cloudless nights – particularly if you are away from city lights – you have a pretty good chance of spotting one or two.  However, because individual meteors are unpredictable, actually taking a photo of a shooting star can be much more of a challenge.  It is certainly possible, but takes some patience and a lot of luck.

Meteor showers however, are a much more predictable phenomenon and with a bit of planning , a bit of practice and only a little luck, you can get some amazing photos of meteors.

A meteor shower is a celestial event in which a number of meteors are observed to radiate, or originate, from one point in the night sky. These meteors are caused by streams of cosmic debris entering Earth’s atmosphere at extremely high speeds on parallel trajectories. Most meteors are smaller than a grain of sand, so almost all of them disintegrate and never hit the Earth’s surface.

Perseid Meteor Shower

The Perseid meteor shower, which occurs every year (usually in August) is the most reliable shower year after year.  It provides spectacular streaks of light that illuminate the night sky, and it’s not uncommon for hundreds of meteors to delight skywatchers over a period of just a few hours.

The best days nights to view and photograph the Perseid meteor shower vary depending on the year and the location, but (for example) in 2013 the best dates in the USA are 11-12 August and in Asia are 12-13 August.

Equipment

To photograph a meteor or meteor shower we will be using long exposures of 5-30 seconds (or longer), so (as in all low light photography), a tripod is critical.

A remote shutter release or intervalometer  will be very handy (although you could manage without if you had to)

Best to have a wide angle lens (the lower the aperture the better)

Location

What you see during a meteor shower depends on your location, the weather, and light pollution. The best places to observe and photograph the event are away from cities and other sources of artificial light. While you can see meteors even in cities, you are more likely to get a better photograph in dark skies.

Technique

  • Find a location far from city lights,
  • Set up your camera on the tripod,
  • Set the lens to manual focus and focus on infinity,
  • Set you aperture as wide as it will go
  • Select a reaosnably high ISO  – 1600-3200
  • Select manual focus and focus on infinity (∞)
  • Turn off the image stabilization (IS or VR)
  • Aim the camera toward the sky.  Since you don’t know where a meteor might fall, we suggest that you aim your camera about 45 degrees away from the shower’s radiant (the constellation for which the meteor shower is named), and about 45 degrees above the horizon.
  • Expose your digital camera for 5 or 30 seconds (anything longer may produce blur and movement in the stars)

    You may be happy to take individual shots, but we recommend that you select continuous shooting, and set the remote trigger to take continuous shots so that you effectively take one photo after the after for as long as the shutter is depressed.  (note : make sure that you take some test shots first and check the photos to satisfy yourself that your serttings are OK)

Each photo will accumulate faint starlight on the sensor and, if you’re very lucky, a meteor streak crossing the frame. You may need to shoot hundreds of frames to get a meteor to show up, so persistence is the key.

Find a location far from city lights, set up your camera on the tripod, set the lens to manual focus and focus on infinity, turn off the image stabilization (IS or VR) and aim the camera toward the sky.  Since one has no idea where a meteor might fall, it’s always best to aim your camera about 45 degrees away from the shower’s radiant (the constellation for which the meteor shower is named), and about 45 degrees above the horizon.  The best times are usually during the hours before dawn when meteors can appear more plentiful.

With the lens open all the way, focus on infinity (∞) and expose your digital camera for up to 30 or 60 seconds; anything longer may produce more noise than anything else.  Your exposure will accumulate faint starlight on the sensor and, if you’re very lucky, a meteor streak crossing the frame.  You may need to shoot hundreds of frames to get a meteor to show up, so persistence is the key!  Remember, you can always delete those images with no meteors on them.
How to Take Good Photos

“How Do I Take Good Photos?” or “How do I Take Better Photos” are amongst the top questions asked by beginner photographers.

It is not a question that is easy to answer, because exactly what constitutes a “good” photo can be difficult to define, because it is largely dependent on the purpose of the photo.

A “good holiday snap”, will be very different to a “good product photo” or a “good corporate headshot”, a “good glamour model photo” or even a “good forensic photo”.  Every “type” of photo will have different criteria which determines how effective the photo is at satisfying it’s specific purpose – and therefore how “good” it is.

dslrWhy are You Taking the Photo?

The very first  (and most important) thing you need to decide therefore is what is the purpose of the photo ?

How will the photo be used? Who will look at it? What “message” do you you want the photo to give ?

General “Good Photo” Characteristics

All that being said, and recognising that the purpose of your photo will heavily influence whether it is ultimately good or bad (i.e. whether it suits the purpose), there are a number of characteristics which are generally accepted as being important in making a good photo

  • Composition – Every photograph needs a strong underlying compositional order so that it grabs the eye from a distance. If it can’t grab your attention, it will never be an interesting photo, regardless of how many fine details it might have.
  • Content – Once a photo has caught your attention, it needs to have details to keep the eyes interested.
  • Contrast – Most (but not all) good photos have contrasting elements.  Contrast may may be represented as colours, textures, brightness or other elements of a photo which differentiate some parts of it form others. You should be able to defocus your eyes and look from a distance, and the basic organization of elements should still be obvious.
  • Focus – Most (but not all) good photos have a focus point which draws the eye and reinforces the “message” of the photo.
  • Punchline – The best images have a punchline. A punchline is what you find after you look around the image.
  • No Distractions –  Anything that isn’t directly helping the composition takes away from it

Understanding the basic elements of a Good photo is a great way to start taking Good photos, but before taking any photo you should consider the purpose of it.

Once you have determined the type of photos you want to take, have a browse through the “How to Take Photos” website to find more specific (and sometimes technical) information about techniques you can follow to take the best photo for the purpose you have chosen.


How to Take Photos of Fireworks

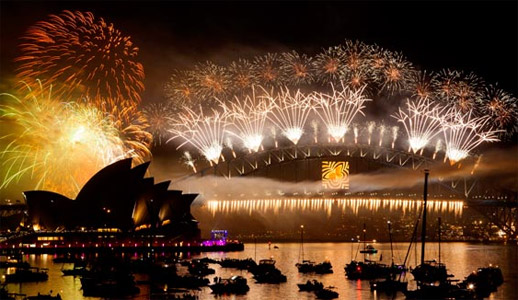
Whether it is Christmas, New Years Eve, Independence day, the Olympic Games Opening/Closing ceremonies, Guy Fawkes night – or just about any major event, Fireworks displays often form the centerpiece of many public celebrations.

fireworks-sydney I’m sure you’ve admired spectacular photographs of fireworks, and wondered how the photographer does it. You may also have been a bit daunted by the prospect of photographing fireworks yourself – but there is no need – with a few simple techniques, you too should be able to take awesome firework photographs.
This post provides a quick and easy reference guide to taking photos of fireworks. It covers the basics of firework photography – allowing you to “give it a go” yourself and experiment to see which effects work best for you.

If you’re tired of your own festive pictures coming out grainy, blurry, underexposed, overexposed, or just plain dull and boring then this guide to firework photography should help

Camera Settings

It is easy to get overwhelmed with the many setting options available… But our suggestion is to keep it simple. We’ve outlined below suggested basic settings (although we do suggest you experiment with them for different effects)

Camera Mode

If your camera has one, definitely go with Manual mode – this gives you the greatest control and will allow you to take many shots that are just not possible in Auto modes.

ISO

You want the highest quality image possible so use the lowest possible ISO – we suggest an ISO of 100

Aperture

The light that the fireworks emit is quite bright, so apertures in the mid to small range tend to work well, we suggest an aperture setting between f/8 to f/16.

Shutter Speed

For fireworks photos, this is the most important camera setting you’ll need to worry about. What makes fireworks interesting is how their motion across the night sky illuminates a path and creates beautiful streaks and patterns. Your eye sees it, but with a fast shutter speed, your camera doesn’t.

So to give your camera a chance to record those streaks and patterns, you need to make sure your shutter is open long enough to get them in.

We suggest a shutter speed of a 3 to 6 seconds – which should be enough to capture a short burst, without overwhelming the photo with too may bursts (and probably overexposing the shot)

Focus

You will usually be shooting fireworks from quite some distance, it will also be dark, and your camera will probably have problems with auto focus, so select Manual focus, and set the focus to infinity.

Flash

Turn off the flash. The fireworks are bright enough, and your flash wouldn’t effectively reach them, but may overexpose elements in the foreground.

Choosing a Location

The spot you choose to take photos from is critical. Here are some things you should take into consideration.

  • Try to work out where the fireworks will be bursting and get a spot with an unobstructed view of that area. You probably want to see fireworks in front of you, not above you.
  • If the fireworks are popular (and most will be), you’ll need to show up early to get a good spot. Ideally scout out the location beforehand (one night before the event is ideal) and have an idea of some preferred spots (you may not be able to get the “perfect” one you want)
  • Also try to determine the wind direction and get upwind of the fireworks so that your shots aren’t obscured by smoke blowing toward you.
  • Find a spot where you can avoid getting a lot of extraneous ambient light in the picture, as this will cause an overexposure.
  • When scouting out your location, choose some interesting features to serve as the background. This will make your photos more exciting for others to view.
  • Watch out for trees and buildings which could block your view, and street lamps and other lighting which might make your exposures tricky.
  • Try to find landmarks or other interesting things you can use to make your compositions more interesting.
  • Try to find a unique vantage point: near a body of water that will reflect the fireworks, high up where the fireworks are at eye-level (on a rooftop, balcony, or bridge), etc. Get creative and go where other people aren’t.

 Keep it Steady

Because you will be using timed exposures minimising camera movement is very important :

  • Use a Tripod – make sure that you use a sturdy tripod. Also be mindful of others and try not to setup the tripod where it may obstruct (or can be bumped) buy others.
  • Remote Shutter release – ideally use shutter release cable or remote shutter release in Bulb mode so you can determine exactly when and for how long the shutter is open – without actually touching the camera and potentially blurring the shot
  • Image Stabilisation – Turn OFF (image stabilization) or VR (vibration reduction). This is designed to minimise camera shake when hand held, but when used on a tripod can actually cause instability.

 Frame the Shot

You will probably need to “guess” where the action will be (and may need to move your tripod and reframe the shot partway through the fireworks display).

Frame carefully to exclude other light sources that might distract from the fireworks or cause your photos to be overexposed.

Don’t necessarily just point your camera at the sky, and consider using wider angles (rather than zooms) to capture other elements (e.g. trees, buildings, bridges, etc..)

You can often take more interesting fireworks photos by including buildings in the background or spectators in the foreground.

Technique

Frame the picture before shooting. Look through the viewfinder during the first few bursts and figure out where the action is. Point your camera at that spot and leave it there. You don’t want to be looking through the viewfinder while you’re trying to shoot, because you’ll likely shake the camera or your timing will be off.

Use the BULB (B) setting, which will keep the shutter open as long as the button is depressed. A rule of thumb is to open the shutter as soon as you hear or see the rocket shooting into the sky and to leave it open until the burst is dissipating. This will usually take several seconds.

Don’t keep your shutter open too long. The temptation is to think that because it’s dark that you can leave it open as long as you like. The problem with this is that fireworks are bright and it doesn’t take too much to over expose them, especially if your shutter is open for multiple bursts in the one area of the sky. By all means experiment with multiple burst shots – but most people end up finding that the simpler one burst shots can be best.

Make sure that you periodically check your results. Take a few shots at the start and do a quick check to see that they are OK before shooting any more. It is not necessary to check after every shot once you’ve got things set up OK (or you’ll miss the action) but do monitor yours shots occasionally to ensure you’re not taking a completely bad batch.

Experiment

A fireworks show usually involves many, many different types fireworks, with different effects, colours and styles, so be ready to experiment,

Different aperture and ISO settings will affect the brightness of the surroundings – bright surroundings are distracting, but subdued rather than completely black surroundings are much more interesting.

Also experiment with taking shots that include a wider perspective, silhouettes and people around you watching the display. Having your camera pointed at the sky can get you some wonderful shots but sometimes if you look for different perspectives you can get a few shots that are a little less cliche and just as spectacular.

Post Production

Many of the “most spectacular” firework photographs are actually made up of a combination of a number of different photos. It is quite common for example to combine several “bursts” to form a single “multi burst” photograph. You may also like to superimpose firework bursts onto an existing scene (e.g. a shot taken before the fireworks started). The technique for doing this is beyond the scope of this post, but we plan provide some How To Photo Editing Guides on this type of thing in the future.

How to Photograph Fire Twirlers

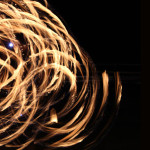
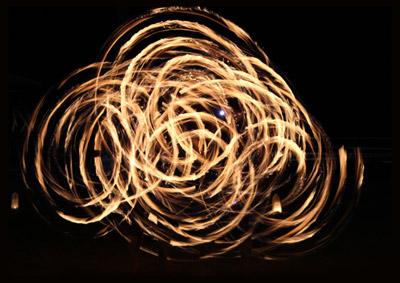
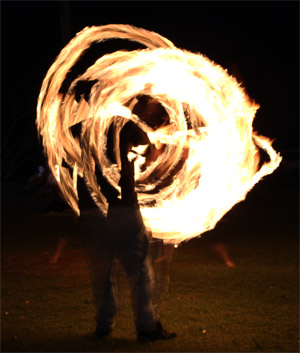
fire-twirlingIf you’ve not tried it before, photographing Fire Twirlers, Fire Breathers and other types of fire performers can be a little tricky. For maximum effect, most performances of this type are done in low light (if not completely dark) areas so apart form anything else, you need to be fairly comfortable with your camera’s layout and how to change settings without too much fiddling about.

Like most things photographic, there is no “definitive setting” that must be used to take these types of photos – as the specific situation, and the type of effect you are trying to achieve will vary… but this post provides a guide to some of the basic settings you should start out with – and gives some ideas about things you could try to change the effect.

Low Light Photography Fundamentals

As this is a low light situation, it is most likely that you will use longer shutter speeds so stability is critical (hand holding is not really ideal for anything less than than 1/50th of a second). The following basics are suggested for low light photography :

  •  A sturdy tripod is highly recommended (alth0uhg you could probably manage with a stable surface, such as a table or backpack at a pinch).
  • A remote trigger or cable release, although a shutter delay can be used if you don’t have a remote trigger
  • Manual Focus – in low light auto focus tends to be unreliable
  • Turn OFF image Stablilisation – you should do this any time you use a tripod as it can actually introduce movement
  • As low an ISO as possible – I suggest starting at ISO 100 and only increasing it if necessary to reduce shutter speeds
  • A fairly large (narrow) Aperture – I suggest F8 or higher as this will give a decent depth of field (allowing you to focus over a wider area) and show more flame detail – as opposed to flame trails (unless of course this is the effect you are after).

Experimenting with Settings

fire-twirlerOnce you have the basics (above) setup, take some trial shots and adjust some of the settings outlined below to create the effect you are trying to achieve

Location – check the background and try to minimise other light sources… Street lights, Cars and other lights can be a distraction and ruin the shot. Try to locate yourself somewhere where the background is as dark as possible.

Shutter Speed – Long shutter speeds (5 secs +) can produce interesting effects , but can be very cluttered and busy. You will probably find that shorter shutter speeds (1-3 secs) may be best, although this will depend on the effect you are after and the type of fire performance.

Aperture – decreasing (widening) the aperture will decrease the depth of field, making it harder to have the whole performance in focus (particularly if the twirler is moving around), but increasing (narrowing) the aperture will require longer shutter speeds or higher ISOs.

White Balance – Daylight balance is probably best to start off with as it will give you a warm looking result, but you can try experimenting with this for different effects – Cloudy and Shade settings will warm it up, whereas Tungsten and Flourescent will create a bluer (colder) effect.

ISO – Don’t increase your ISO too much. Most long exposures (especially at night) will produce a lot of noise using higher ISOs. If you want to decrease the shutter speed or freeze the motion, increasing ISO is an option though.

What about Flash ?

If the focus of your photo is to be the flame itself then you wouldn’t consider using flash. However, if you want the performer to be a feature, you may like to consider flash to highlight and freeze the motion.

Without using flash, the performer will be blurred and/or ghosted. To bring the performer into focus you may like to try using a a slow shutter speed to capture the environment and a flash strobe to freeze the performer. This will give you the benefit of capturing your fire trails with a sense of movement and fluidity, while also having your fire spinner in sharp focus.

For fire trails, a flash technique worth trying is rear (or 2nd) curtain sync – this means that the flash fires at the end of the exposure and when doing long exposures is a good way to get fire trails and still freeze the performer. (Check your camera to see how to setup 2nd Curtain sync).

Note that direct on-camera flash can be cold and flattening – a side strobe light or off-camera flash could be ideal to add drama and depth to your image.

It can be a delicate balance to find the right settings to create good fire trail photos – each situation will be different depending on available light and how fast the performers are moving. However, following the steps in this guide (and experimenting) should provide you with a good basis for creating interesting and impressive photos of fire.